Mission Builder: Difference between revisions
No edit summary |
|||
| (8 intermediate revisions by 2 users not shown) | |||
| Line 189: | Line 189: | ||
=== Finishing Touches === | === Finishing Touches === | ||
A few random things you can use to modify the look of your mission. | |||
==== Water ==== | |||
Water is created in cubes - either single small areas or one big enough to fill the entire map. You can find '''Water''' under '''Mission Objects'''. Don't worry about the parameters, they're easy to change later. | |||
[[File:MB Screen 23.jpg]] | |||
Once you have your water (it will look like a 2D sheet, only the surface is really visible) you can move it into place and start changing the parameters. I recommend opening up a level which has water you like the look of, and copying that. You can make the water appear to flow, change the colour, and all sorts of other things. I've copied the water from the gates of Elms, and made it look a bit less appealing. | |||
[[File:MB Screen 24.jpg]] | |||
==== Weather ==== | |||
You can also play with the depth fog. If you look through the list of objects which are created for you, you should be able to find '''Sky'''. There are various different parameters - in this screenshot I've reduced the fog distance and visible distance down to almost nothing. | |||
[[File:MB Screen 25.jpg]] | |||
You can also change the fog colour (it uses [http://en.wikipedia.org/wiki/RGB#Numeric_representations RGB] colour values). Here I've produced a nice pink fog. Very pretty. | |||
[[File:MB Screen 27.jpg]] | |||
The final thing you can try is to change the sky texture. Have a look at '''MaterialList''' under '''Media'''. This is your current sky texture. If you find that file, there will be others in the same directory with the same extension. Those are the other possible sky textures. Play around until you find one that suits the mood of your level. This is the stormy sky texture, but there are a lot of others. | |||
[[File:MB Screen 26.jpg]] | |||
==== Sunlight ==== | |||
The last thing to try is changing the colour of the sunlight, if you want a sunset or stormy feel. Find the '''Sun''' object, and you can change the colour in the same way as with the fog. You will need to recalculate lighting for this to work. Here is an example with a reddish sun, although it turned out a bit too pink to really look like sunset. I also set the fog to yellowish brown, to blend in with the desert a bit better. | |||
[[File:MB Screen 28.jpg]] | |||
== Creating a Wilderness Map == | |||
This guide goes over some of the parts of the mission builder that are most relevant to wilderness maps. Honestly there's not that much of a difference between a race track and a wilderness map - it's just more work, as you have to take into account that players can and will drive anywhere on the map. If you feel confident in your ability to make a map, just skip to the end and add the car paths and spawn areas, and you'll be good to go. | |||
=== Terrain Generation === | |||
Unlike race tracks, the whole area is important. Players will be able to go everywhere, so we need to make sure there's something interesting in every direction. | |||
The first thing to do is to look at other maps in the area, try and work out how they were created. | |||
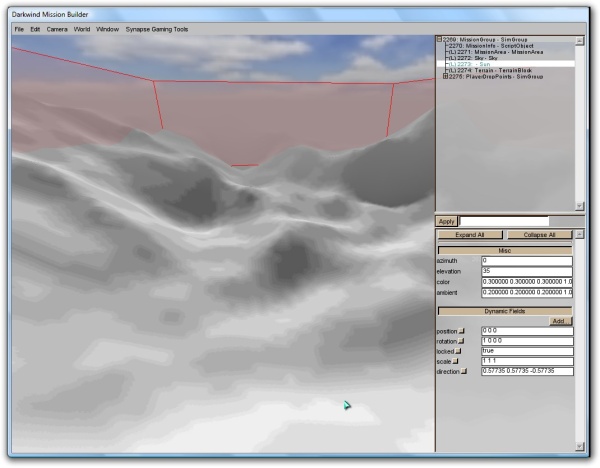
I'll be using an empty map to demonstrate these transformations. The sun has been turned down to reduce glare, and fog is reduced. | |||
[[File:MBW_Screen1.jpg]] | |||
The green area shows where the terrain will repeat. Darkwind maps loop forever (as you probably noticed), and this line shows the edge of the map section. You can't paint textures outside this area - you need to head over to the other side of the map. It doesn't have any effect in-game though. | |||
Making a map starts in terrain terraform editor mode. There are two types of transformation - generators and modifiers. They work in order from top to bottom, and can be layered to produce complex effects. | |||
==== Generators ==== | |||
Generators override the terrain, and wipe out everything above them in the stack. There's no point using more than one of these, they just override each other. The "New Seed" button gives a different random terrain. The green minimap in the bottom left shows a preview of the terrain that will be generated. | |||
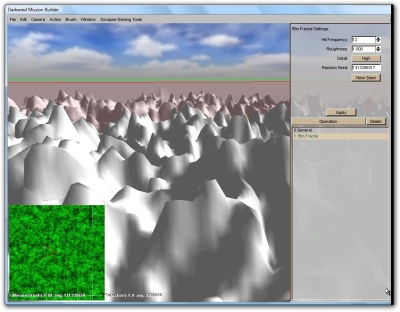
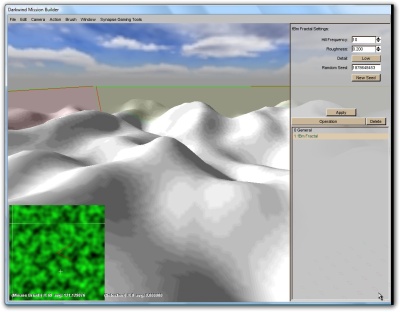
*'''fBm Fractal''' - basic hilly terrain. Hill frequency is (more or less) the number of hills in the area. Roughness is the steepness of the hills (I think - it doesn't actually seem to do much). Detail adds smaller hills between the large ones. This is the most useful generator for most areas. | |||
[[File:MBW_Screen2.jpg]] | |||
*'''Rigid MultiFractal''' - produces ridges or sand dunes. This is used for most of the terrain along the SS-Elms route. Frequency and detail as above. | |||
[[File:MBW_Screen3.jpg]] | |||
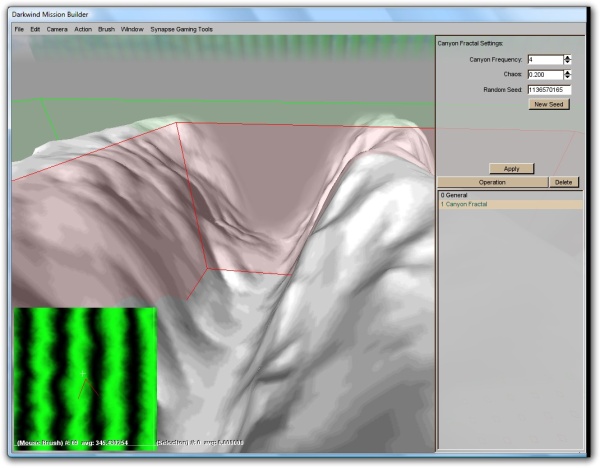
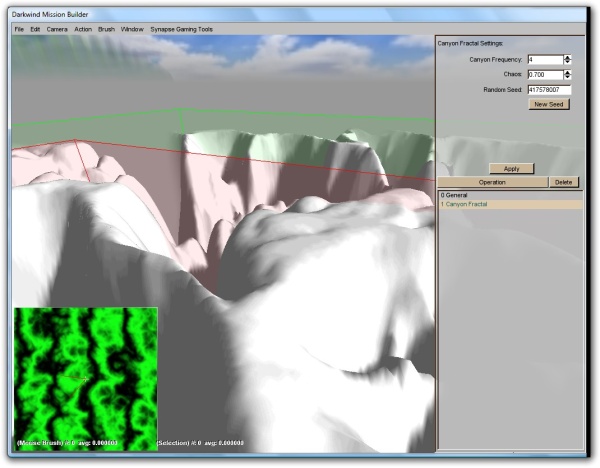
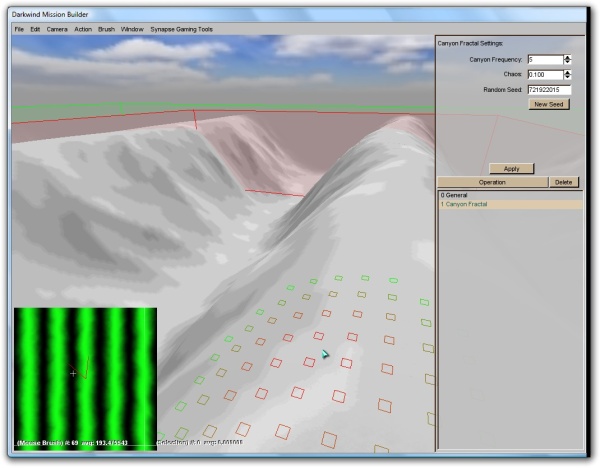
*'''Canyon Fractal''' - Produces steep-sided canyons. Think of Sarsfield, or The Maze. Chaos adjusts how winding the canyons are. With low numbers of canyons and moderate roughness, this can produce rolling hills. | |||
[[File:MBW_Screen4.jpg]] | |||
''Low Chaos'' | |||
[[File:MBW_Screen5.jpg]] | |||
''High Chaos'' | |||
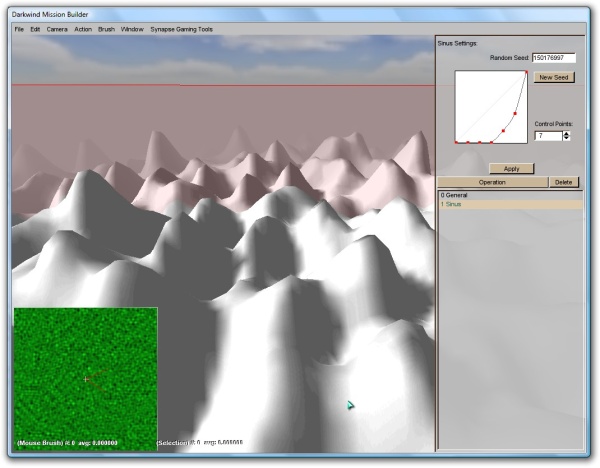
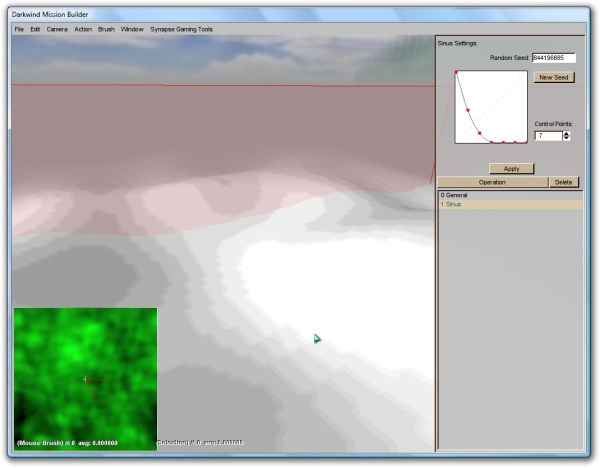
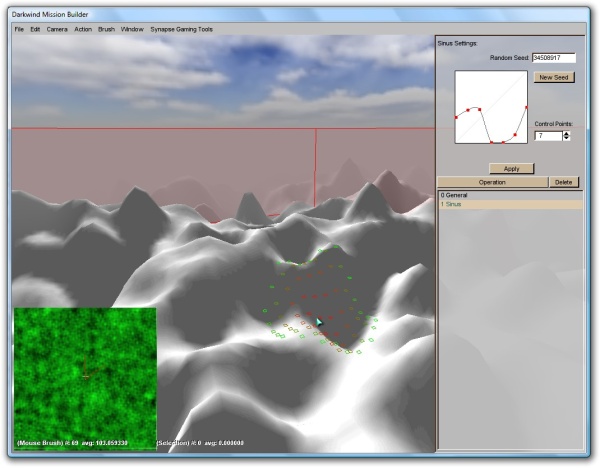
*'''Sinus''' - produces small bumps all over the map. The graph will be important for a lot of operations, so it's worth explaining how it works. The height of the graph shows how much of that size effect will be part of the final terrain - large bumps on the left, small ones on the right. A couple of examples: | |||
[[File:MBW_Screen6.jpg]] | |||
''Small Ripples'' | |||
[[File:MBW_Screen7.jpg]] | |||
''Large Ripples'' | |||
[[File:MBW_Screen8.jpg]] | |||
''Varied Ripples'' | |||
* '''Bitmap''' - claims to use an 8 bit bitmap as the base for a terrain. Unfortunately I can't work out which folder it looks in for bitmaps. Anyone who works it out, let me know. | |||
==== Modifiers ==== | |||
*'''General''' - sets max and min terrain height. This is the biggest effect on the "hilliness" of the terrain. This is always the first transformation, and can't be deleted. | |||
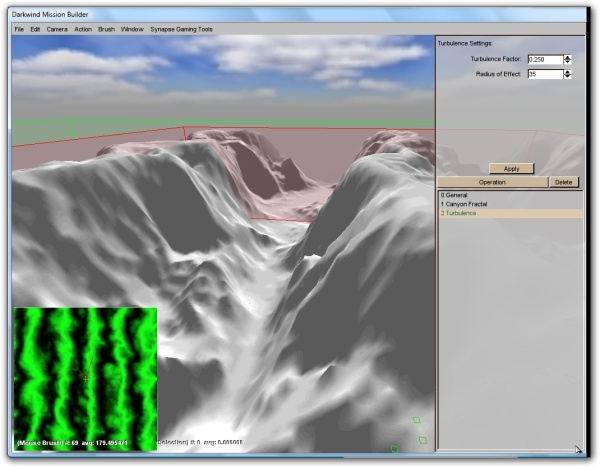
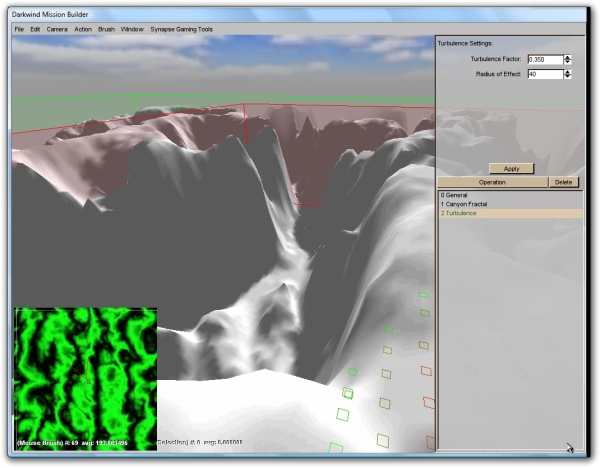
*'''Turbulence''' - adds extra noise and roughness to the terrain. It gives a twisting sort of effect. Requires clicking on a higher level and back before seeing any effects. | |||
[[File:MBW_Screen9.jpg]] | |||
''No Turbulence'' | |||
[[File:MBW_Screen10.jpg]] | |||
''Light Turbulence'' | |||
[[File:MBW_Screen11.jpg]] | |||
''Heavy Turbulence'' | |||
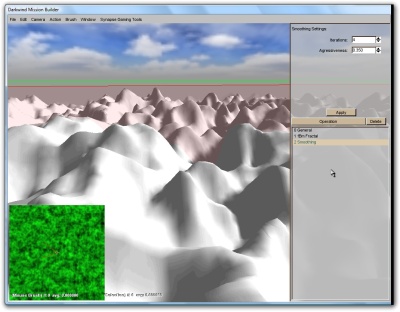
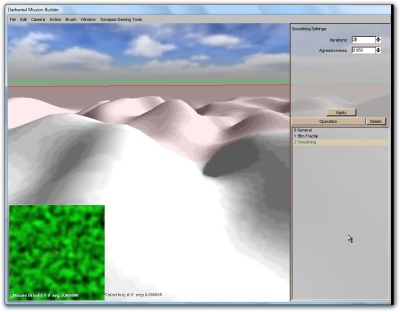
*'''Smoothing''' - the opposite. Smooths out rough edges and makes a more even, rolling terrain. Number of iterations has the biggest effect on the outcome. | |||
[[File:MBW_Screen12.jpg]] | |||
''No Smoothing'' | |||
[[File:MBW_Screen13.jpg]] | |||
''Light Smoothing'' | |||
[[File:MBW_Screen14.jpg]] | |||
''Heavy Smoothing'' | |||
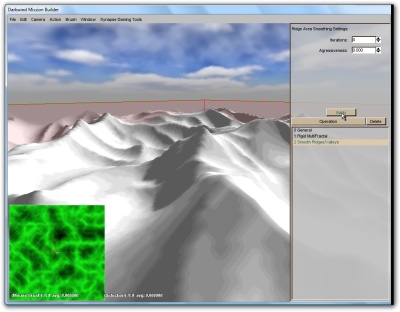
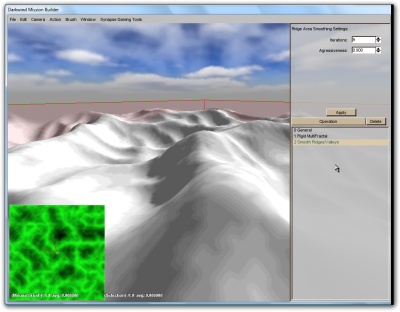
*'''Smooth Ridges/Valleys''' - smooths only the top of mountains and ridges. Useful to avoid sharp peaks that cars have trouble driving over. | |||
[[File:MBW_Screen15.jpg]] | |||
''No Smoothing'' | |||
[[File:MBW_Screen16.jpg]] | |||
''Heavy Smoothing'' | |||
*'''Filter''' - applies a transform based on the height of the terrain - each input height can be linked to an output. There are all sort of complex effects that can be achieved like this, although I haven't experimented much. | |||
[[File:MBW_Screen17.jpg]] | |||
''The original terrain'' | |||
[[File:MBW_Screen18.jpg]] | |||
''Filtering used to set the terrain to three levels'' | |||
*'''Thermal Erosion/Hydraulic Erosion''' - don't appear to do anything. Let me know if you work it out. | |||
=== Automatic Texture Generation === | |||
Painting the whole map by hand would be slow and impractical, so unless we just want uniform sand we need to automatically paint textures. | |||
This is more art than science. I've managed to get it to work, more or less, but I'm not sure exactly what the rules are. | |||
Use the add material button to add textures to your level. They come with a standard fractal distortion, just to add a bit of roughness to the edges and make the whole thing appear a little more natural. There are two additional placement options: | |||
* '''Place by Height''' - Good for putting rock textures on the tops of hills, or underwater textures at the bottom of pools. Here's a quick example: | |||
[[File:MBW_Screen19.jpg]] | |||
You can see that the sand is restricted to the middle layer, with red sand at the bottom of pits and black rock at the top of the hills. | |||
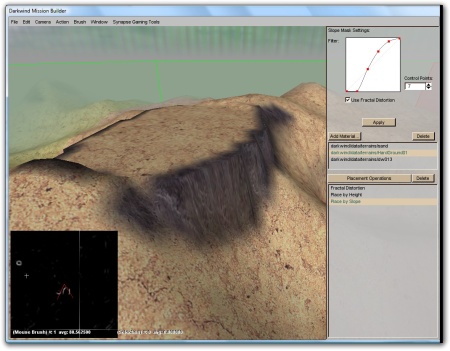
* '''Place by Slope''' - Best used in combination with place by height. In this example, the black rock has been set to large slopes only, so the plateau on top reverts to the yellow sand. | |||
[[File:MBW_Screen20.jpg]] | |||
=== Sculpting the Map === | |||
The techniques here are the same as for the race track above. Try to look at the map as you would playing it. Think about points where the player can sit at the top of a cliff or behind a pit and get easy kills, or use areas the AI has trouble navigating in order to escape. Then stop them. Remember, you score points for every player who dies on your map, double points if you can get them to drive into pits. | |||
It's up to you how much hand sculpting you want to do. Some maps are just a few tweaks on top of a generated terrain, whereas some (The Pits is a good example) are largely built by hand. Hand built terrain can look amazing, but it's a lot of work - up to you. I prefer to have the computer do most of the work because I'm a lazy programmer. | |||
==== Regenerating Textures ==== | |||
If you adjust the terrain and want to automatically texture it, you'll need to swap into Terraform Editor mode and back out again before your changes are recognised. There are actually a few situations like this, and swapping between modes or turning fractal distortion off and on again usually fix them. If not, you may need to quit and restart. | |||
=== Decorations === | |||
Again, this is covered in the race track section. Adding just a few trees or shrubs can make a big difference. | |||
Note that even though the terrain will loop, the objects won't be recreated. You can put objects outside the mission area though, which is a good idea if you have something like a bridge. | |||
=== Car Paths and Spawn Areas === | |||
This is the major technical difference between a wilderness map and a race track. Like the track, car paths are needed to direct the AIs along your roads (not that they pay any attention, but you have to make the effort). However the form of the path is different and you may need more than one. You will also need multiple spawn areas, along with ambush points. | |||
==== Car Paths ==== | |||
The simplest maps (which is most of them) have a single car path that follows a single road across the map. These are by far the easiest to make. Make a path just like you would for the race track, but instead of a loop you want a single line from one edge of the mission area to the other. The AI will head the first waypoint on the next repeat of the map when they get to the last waypoint on this repeat, so make sure the two points are close to each other. You also need to make the points big enough that the AIs won't miss them if they're driving slightly off road. | |||
More complex maps may have multiple car paths that join and split it complex ways, but I can't help you there. Have a look at the gates of SS if you want an idea of how bad it can get. Then just stick to making maps with a single road on. | |||
==== Spawn Areas ==== | |||
There are three types of spawn area available. Trader and Pirate spawns are the normal spawn points, and do what you expect them to. Traditionally the pirates spawn 100m - 200m behind the traders, but you could try some more unorthodox things if you want. Bear in mind that a head-on spawn will (I believe) put the players in the pirate spot, with the AIs facing them in the trader spot. | |||
These types of spawn consist of a SimGroup named in the form PlayerDropPoints1Pirate or PlayerDropPoints1Trader, which contains four SpawnSpheres. These mark (in order) the front-left, front-right, rear-left, and rear-right corners of the area. | |||
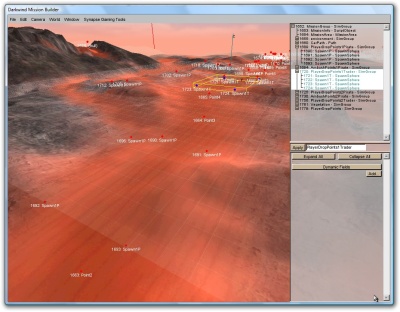
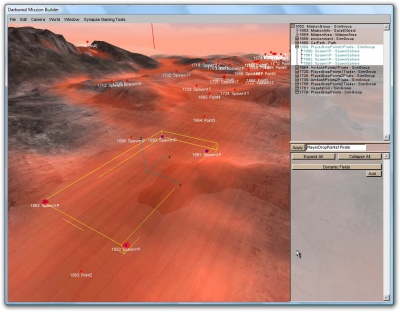
[[File:MBW_Screen21.jpg]][[File:MBW_Screen22.jpg]] | |||
''Traders(left) and Pirates (right)'' | |||
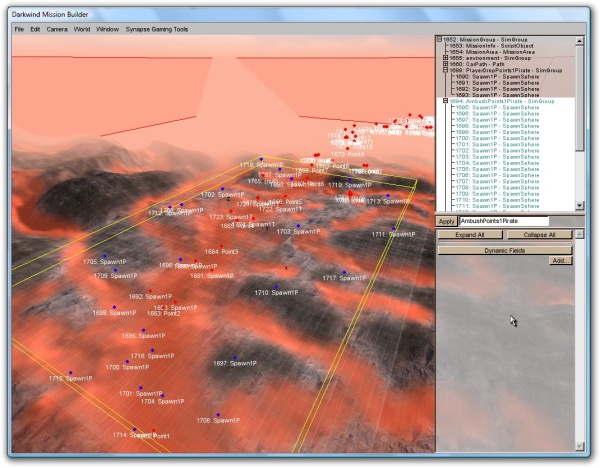
The third type is the ambush, named in the form AmbushPoints1Pirate. These are optional, but I like to add one to each spawn point, just to stop people getting complacent. These consist of 25 or more SpawnSpheres, which each give the position and facing of a single car. | |||
[[File:MBW_Screen23.jpg]] | |||
''Ambush points'' | |||
You can have as many spawn areas as you like, just keep increasing the number. One nice trick (which I didn't think of when making Oil Slick, unfortunately) is to add spawns at both ends of your path, facing towards the centre. Driving the map in both directions adds a bit of variety, and it means players will be seeing all that nice decration you added from both sides. | |||
== Submitting Your Mission == | |||
== Notes == | == Notes == | ||
| Line 231: | Line 434: | ||
'''Checkpoints''' | '''Checkpoints''' | ||
ONLY USED ON | ONLY USED ON RACE TRACKS | ||
You need a set of these, probably between 5 and 10 of them. In fact, the more the better. Make sure they overlap the track boundaries generously, so we don't penalise people who drift over the edges a little. | You need a set of these, probably between 5 and 10 of them. In fact, the more the better. Make sure they overlap the track boundaries generously, so we don't penalise people who drift over the edges a little. | ||
| Line 242: | Line 445: | ||
'''Spawn Areas''' | '''Spawn Areas''' | ||
RACE TRACKS HAVE 1 SPAWN AREA ONLY | |||
The spawn area is specified by using ''two SpawnSpheres'' inside a SimGroup called PlayerDropPoints. These two SpawnSpheres show the opposite corners of a rectangle into which the cars will be spawned. The first is the 'front' of the starting grid and the second is the 'back' of the grid. The rotation of the first SpawnSphere will be the rotation that cars are spawned at. | The spawn area is specified by using ''two SpawnSpheres'' inside a SimGroup called PlayerDropPoints. These two SpawnSpheres show the opposite corners of a rectangle into which the cars will be spawned. The first is the 'front' of the starting grid and the second is the 'back' of the grid. The rotation of the first SpawnSphere will be the rotation that cars are spawned at. | ||
| Line 267: | Line 470: | ||
__isOffroad __- this takes 2 possible values, or can be omitted. A value 1 means this waypoint is only for offroad vehicles (e.g. the buggy or the landrunner) to use (they have better tyre friction and this can be significant in places where other cars slide a lot). A value 2 means this waypoint is only for non-offroad vehicles. If you omit the isOffroad field then all cars use the waypoint. | __isOffroad __- this takes 2 possible values, or can be omitted. A value 1 means this waypoint is only for offroad vehicles (e.g. the buggy or the landrunner) to use (they have better tyre friction and this can be significant in places where other cars slide a lot). A value 2 means this waypoint is only for non-offroad vehicles. If you omit the isOffroad field then all cars use the waypoint. | ||
RACE TRACKS HAVE 1 CARPATH | |||
ARENAS HAVE BETWEEN 2 AND 4 CARPATHS | ARENAS HAVE BETWEEN 2 AND 4 CARPATHS | ||
| Line 277: | Line 480: | ||
The key thing here is to recognise that the terrain repeats itself, and the CarPaths need to connect to themselves or another CarPath in order to provide data for the NPCs to drive the road over multiple terrain repetitions. It can get a bit confusing, but if you stick to a single carpath that covers exactly 1 terrain repetition then it will work fine. More complex terrains are harder (take a look at gates of somerset for example). | The key thing here is to recognise that the terrain repeats itself, and the CarPaths need to connect to themselves or another CarPath in order to provide data for the NPCs to drive the road over multiple terrain repetitions. It can get a bit confusing, but if you stick to a single carpath that covers exactly 1 terrain repetition then it will work fine. More complex terrains are harder (take a look at gates of somerset for example). | ||
== Some extra notes on getting waypoints and checkpoints right: == | === Some extra notes on getting waypoints and checkpoints right: === | ||
Waypoints: | Waypoints: | ||
| Line 301: | Line 504: | ||
The order of these, rather than their name, determines their position on the grid | The order of these, rather than their name, determines their position on the grid | ||
=== Notes on Racetracks: === | |||
(1) To get the cars spawning at the right place, make sure that the SpawnSpheres are *inside* the PlayerDropPoints simgroup, not after it. To be inside, they need to be directly after the { symbol and before the }; symbols | |||
Like this: | |||
new SimGroup(PlayerDropPoints) { | |||
spawnspheres are in here.. | |||
}; | |||
(2) The scale of the Marker objects (which define the NPC route around the track) is very important. The position of the markers obviously defines where the NPCs should steer towards, but until they cross the edge of a Marker they won't move onto the next one. So if the scale is "1 1 1" they'll have a very hard time driving the track since they will insist on passing through a precise area 1x1 metre in size. If you open up one of the existing files, such as the Northern Desert Circuit, you'll see how the size is used to make them start turnning before they get to the apex in many cases. | |||
(3) Don't worry about the looping constraint, that will be easy to fix by forcing the track to always have 1 lap races. | |||
[[Category: World]] | [[Category: World]] | ||
Latest revision as of 19:38, 16 April 2012
The mission builder is the tool used for creating new race tracks, arenas and scouting areas. I'm going to update this page as I learn more about it, in the hopes that others can bypass some of my mistakes.
Getting the Mission Builder[edit]
This is the mission builder (Windows application, 250MB )
http://www.dark-wind.com/missionBuilder/missionBuilder.zip
There's also a Media Encrypter (Windows executable) which is required if you're making your own DIF models using the Torque Constructor:
http://www.dark-wind.com/missionBuilder/mediaEncrypter.zip
Startup[edit]
After starting the mission builder, you'll see a screen with a list of vehicles and some buttons on the bottom left. Pick a vehicle from the list (they're the model names rather than the in game names, but most are obvious) and click the "Start Mission" button. It doesn't matter much which one you pick, as they all handle terribly - this is the Torque physics engine, not the Darkwind one. Next, choose a mission. Try looking at some of the missions most similar to the one you want to build, to get an idea of what they look like in the editor.
Basic Controls[edit]
Once in the mission, you'll probably find you're looking through the wheels of your car as it falls through the air. Hit tab to switch to third person view. You can drive the car with the mouse or arrow keys to steer and W/S to accelerate/brake. As mentioned it's not very good, but it can give you an idea of where the bumps are on the track.
To get to the editor, press Alt-C to switch to third person camera mode, then F11. If you got it right the mouse wheel will let you move the camera up and down, otherwise you can move the camera up and down with + and - (keypad + and non-keypad -, oddly).
First thing to do is hit F1 and read some of the help. It's mostly accurate and mostly useful, but not everything works the way the help file claims, so be a little careful.
Creating a Race Track[edit]
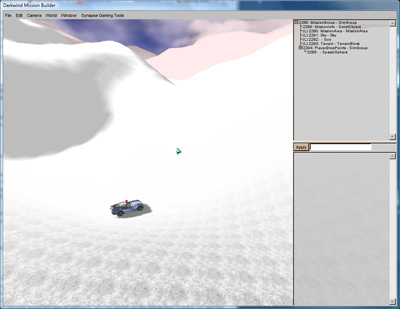
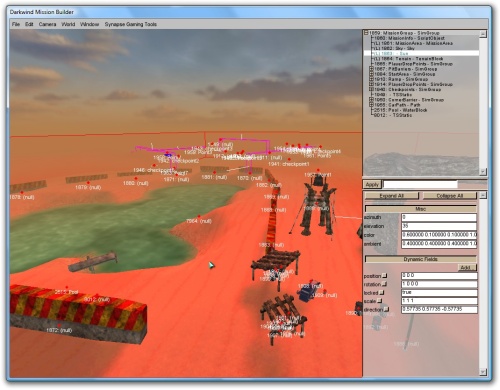
A step by step guide to creating a new racing circuit - a simple figure 8 circuit in a desert area. This tutorial will be aimed at creating a completely new track from scratch. If you want quicker results, you could try just changing the obstacles around on an existing track to produce a new route - in that case, skip ahead to the section on creating models. Start a new mission (enter an existing mission, then create a new one from the file menu), then enter the editor mode as described above. You'll see something a bit like this:
The most important menu is Window, which switches between the different editing modes. We'll go through them in the order they're needed. Notice that they're split into two groups, one to do with models and one to do with terrain. You can do the same actions in most modes in the same group, but the interface will change. We'll start by generating the terrain.
Terrain Generation[edit]
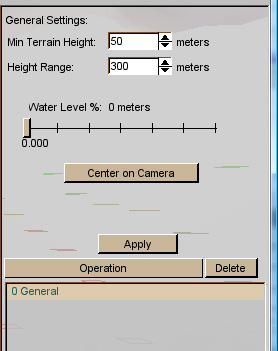
First, we want to create a new area to set our track in. This is done using the Terrain Terraform Editor mode. Select this mode, and you'll see the bar on the right look something like this:
The section at the bottom is the list of all transforms which will be applied to the terrain. You can probably do some very clever things with this (at least if you're more skilled than I am) but we'll keep it simple. If there are any transforms other than General, delete them. Now, click on General. This shows the basic settings for your terrain. Height Range is how high the other transforms are allowed to make mountains, and Min Terrain Height is how low the valleys can be. It's worth setting the min height to be more than zero so that you can dig some pits later on, if you want to. Set range to 25 and min to 50. The slider sets the water level, but this is supposed to be a desert track (and I don't know how it works yet) so let's leave it on zero.
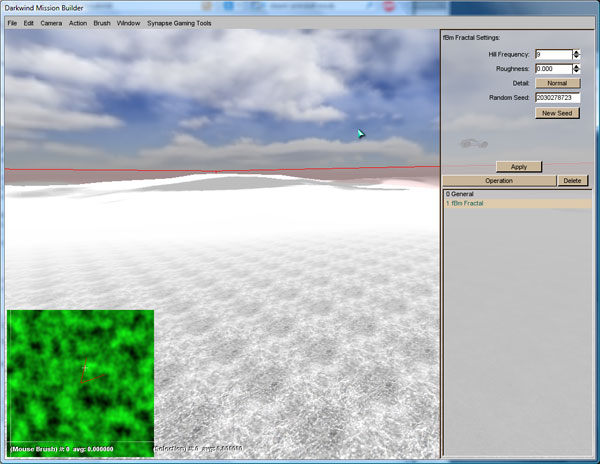
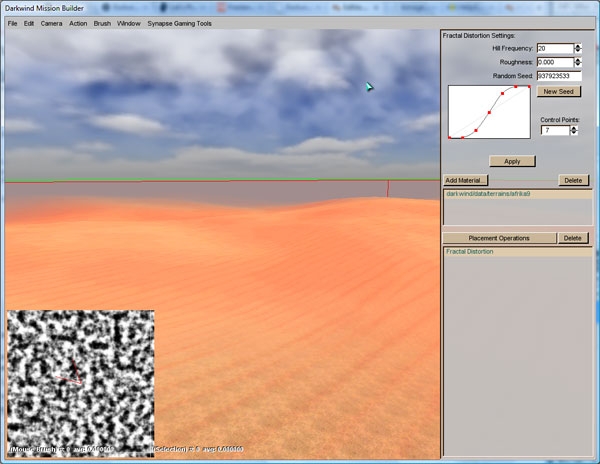
Now we need to create the terrain. Click on the Operation button, and select fBm Fractal. This uses a fractal algorithm to generate fairly realistic hills and valleys. The default parameters should be OK to give us an area of low rolling hills (these are going to be sand dunes, maybe somewhere near Somerset). Now hit "apply", and your terrain will be generated. It should look similar to (but not the same as) this:
If you don't like it, press the New Seed button to re-randomise, fiddle with the settings if you want, and hit Apply again. Once you have something that looks OK, it's time to add some colour.
Texture Painting[edit]
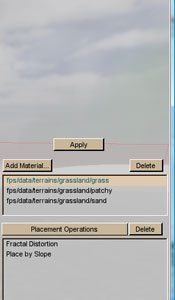
First, we just want to put a basic sand texture across the whole map. Select Terrain Texture Editor mode. The tool bar should look like this:
Delete all the default materials, then press Add material. The sand texture used most around Somerset is afrika9, so choose that. Now press Apply, and you should see the desert texture across your map. There will probably be some odd-looking dark patches though. This is because the shadows of hills and valleys aren't recalculated when you modify the terrain. Press Alt-L to relight the scene, and you should end up with something that looks like this:
This might be a good time to save.
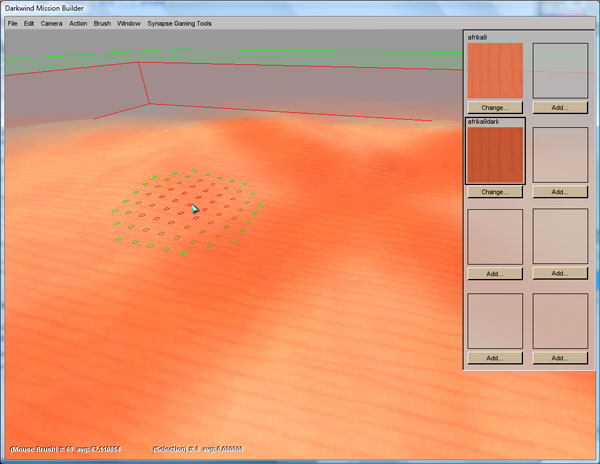
OK, now we need to make the track. I find it easier to draw the track on with textures first before sculpting the terrain, so choose Terrain Texture Painter mode. The eight boxes on the right are the eight textures you can use for this mission. It's a little restrictive, but you can blend textures together to get some nice effects. Press the Add button under one of the empty slots (only one will work), and choose afrika9dark.
You've probably noticed the circular green and red cursor when you move your mouse around the terrain. This is the brush used for all terrain operations (sculpting, painting etc.). The red area gets the full effect and the green area gets partial effect. You can change the siza and shape in the Brush menu. For now, set it to size 9x9, and draw on a rough outline of your track, something like this:
You can't see the whole thing due to depth fog but trust me, it's a figure 8. You'll also want to add in an area for the cars to start, if they don't start on the track (and it makes it a little easier later on if they don't).
OK, track laid out. The next step is to flatten out the track surface and add in hills and so on.
Terrain Editing[edit]
Once you have the empty area, it's time to build your race track. Select Terrain Editor mode from the Window menu, and set Action to Adjust Height. This will allow you to alter the terrain and sculpt your track out of the barren desert. You'll see when you move your mouse around that there is a circle on the ground, red in the centre and green around the edge. This shows the area your tools will affect. Hold down the left mouse button and drag up and down, you will see hills and pits created. This is the main way to modify the terrain. Feel free to stick some hills and pits in the area around your track. You can use Alt-1 to Alt-6 to change the size of the affected area. You can also make other changes to it from the Brush menu. Next, let's use smooth mode. Choose a brush slightly wider than your track, then drag the smoothing tool around the track. This will remove sharp edges and small bumps, making for an easier ride. It's also useful if you've generated some sharp edges with the other tools, and want to make them look a bit more natural. Flatten mode is a more extreme version of this, if you want to give the feel of a more manmade track. Experiment with the other modes if you want - there's a reasonably good undo function if you mess up. Once you feel the track is ready, it's time to add objects. Don't get too perfectionist - you can always come back later.
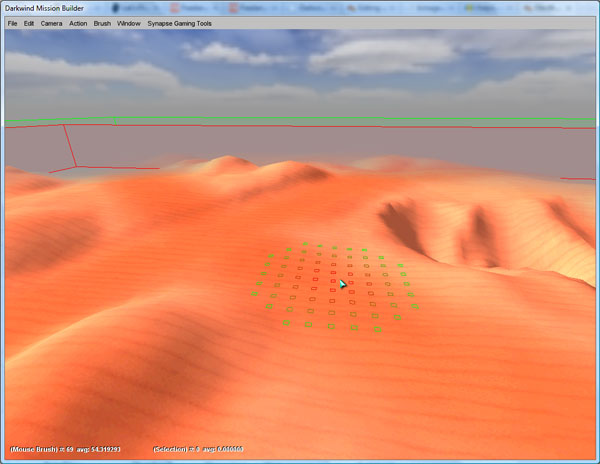
Don't forget to recalculate the lighting once you finish adjusting the terrain. My version of the track now looks something like this:
I decided to have a steep cliff part at the crossroads, so I moved the starting area around to face the other direction. You can just paint over the darker sand with light sand if you want to remove part of the track.
Creating Models[edit]
OK, we have a textured terrain area with roads drawn in. The next step is to add scenery and obstacles. Go to World Editor Creator mode. The toolbar on the right should look something like this:
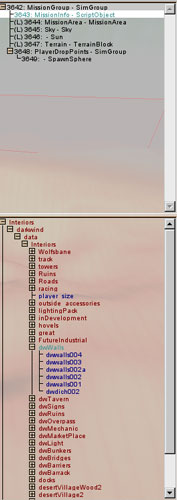
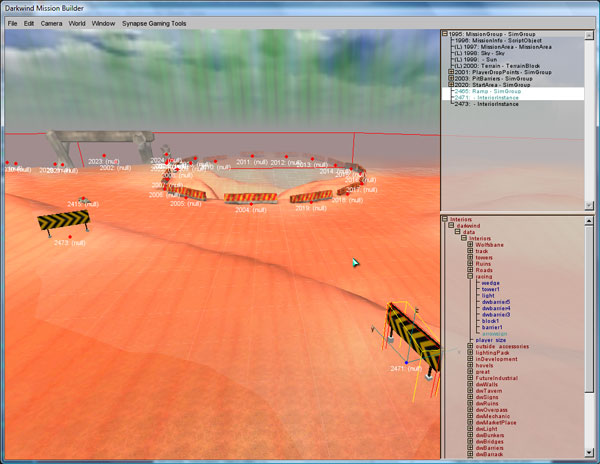
The top part of the toolbar shows the objects currently in the scene - currently just the default ones. The tree view at the bottom lists all the objects you can add. There are a lot. Play around and try out various different models. I'm mostly just going to be using the Darkwind track barriers, which are in the dwBarriers folder. To create one, just click on it and the model will be created wherever the camera is looking. Should look something like this:
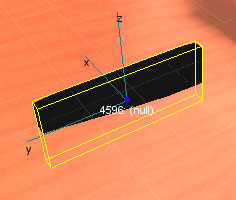
The object is black because we haven't recalculated the lighting yet. Do that and it looks like this:
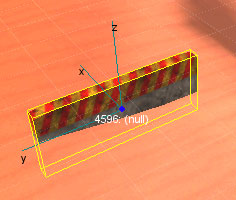
You can move the object by grabbing and dragging the axes, or the object itself. Alt-drag will rotate, and control-alt-drag will scale. Holding down shift aligns the axes to the world rather than the object (only needed if you've rotated it). Put a few barriers and obstacles around your track, and don't forget to save regularly. In the next section we'll look at the mechanics of making your track usable by the AI.
Here is my track after adding the obstacles and barriers. Don't forget the start line!
Waypoints, Checkpoints and Spawn Areas[edit]
There are three types of object we need to add for the race track to work. There will not be visible in the game, but control the logic of the race. Waypoints tell the AI where to drive, checkpints make sure players drive around the track correctly, and spawn points tell the game where the cars should be placed at the start of the race.
We'll start with spawn points, but first we need to quickly cover SimGroups.
SimGroups[edit]
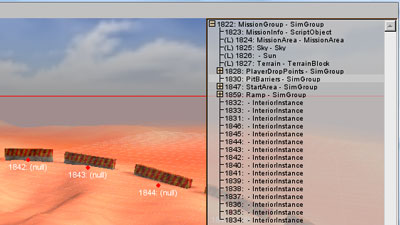
SimGroups are just containers that you can put other objects in. Sometimes they're necessary (as we'll see for spawn points) and sometimes they're just a way of keeping your object list tidy. You can find them at the very bottom of the list of objects, under System. When you create one you'll be asked to give it a name, but it won't appear in the mission, it just exists in the tree view. They're also a pain to delete, so try not to create more than you need.
Create one now to store some objects you created. When it appears in the tree view, alt-click on it and the background will change colour. This is now your active SimGroup, and any new objects (including other simgroups) will be created inside it. To stop that, just alt-click on MissionGroup, which is your main SimGroup which stores the whole scene. A highlighted SimGroup looks like this:
I've created a SimGroup called PitBarriers to hold the barriers around the pit (imaginative, huh?) and highlighted it. If I create a new object it will be added to that group, or I can add all the barriers by selecting them (ctrl-click for multiple selection) and choosing Add Selection to Instant Group from the World menu. Now if I select the simgroup I can move, rotate or scale all the barriers at once.
OK, that's enough about simgroups for now, on to the interesting part.
Spawn Areas[edit]
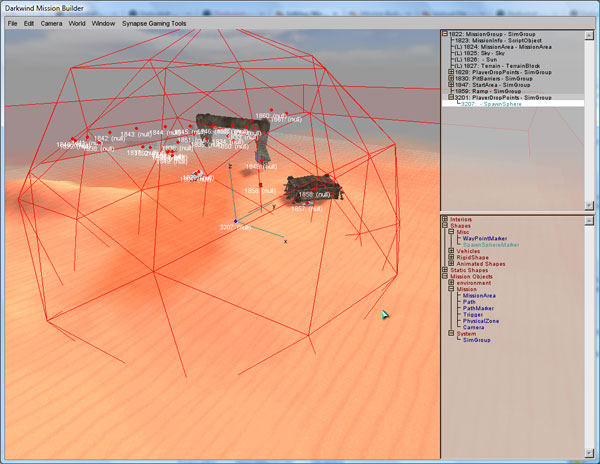
First, create a SimGroup called PlayerDropPoints to hold all the spawn points (don't forget to make MissionGroup active first). We're going to need 25, one for each car in a maxxed out race. With PlayerDropPoints set as your active group, create a SpawnSphereMarker (found in Shapes->Misc). What you get looks something like this:
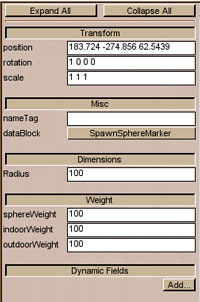
It's too big, but we can fix that. Select World Editor Inspector from the Window menu. The bottom of the right hand bar looks like this:
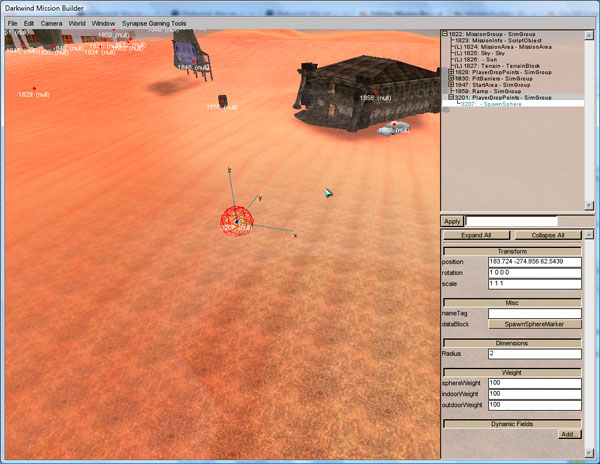
I pressed Expand All so you can see everything. This mode lets you manually set positions, rotations, scales and other attributes of objects. You need to press Apply after every change or it'll lose your edits. In this case, we want to change the radius down to something sensible. Set it to two then hit apply, you should see something like this:
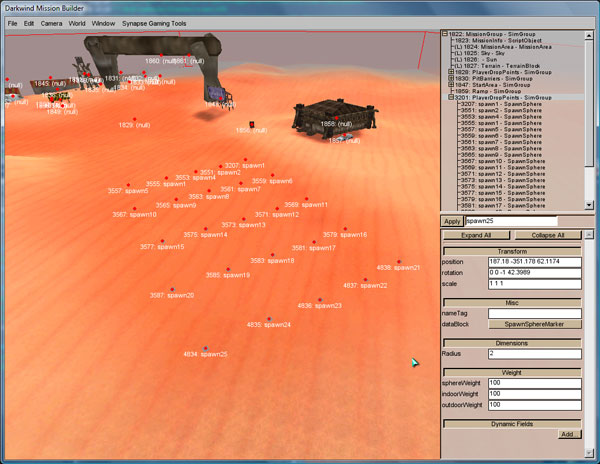
Much more sensible. The box next to apply is for naming your spawn points. Call this one spawn1. This is where the car in pole position will spawn. The y axis shows the direction it will be facing. Couple of useful tips here - copy and paste will make it much less painful to do the other 24, and ctrl-D will drop the object, making it sit on the ground. Useful if you end up with a spawn point in mid air. Now go ahead and create the other 24. The finished product should look something like this:
I'm pretty sure it's the order of points in the container which determines which car goes where rather than the name, so it's less confusing if you keep the two the same.
Checkpoints[edit]
The number of checkpoints you need depends on the details of your track. You need enough to make sure the drivers don't take any shortcuts, or at least not ones you haven't planned. More is usually better if you're not sure.
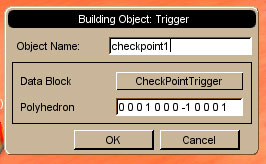
Checkpoints are Trigger objects of the type CheckPointTrigger. You can find them in Mission Objects->Mission, and creating one gets you a popup like this:
Pressing the button allows you to select the type of trigger. You can call it whatever you want, but I'm just going to call mine checkpoint1. This will be the first checkpoint after the start/finish line.
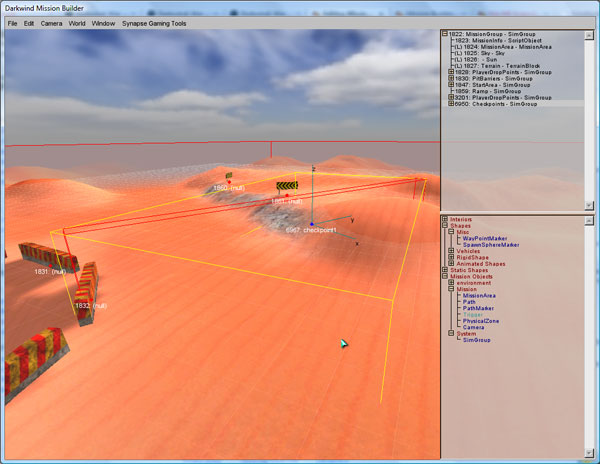
Hitting OK will get you a tiny yellow box. You need to resize this to go across your track - the controls are the same as for other objects. Make sure you cover the whole track out as far as someone could legitimately drift. It also needs to be set into the ground, and go high enough to catch jumps. Mine looks like this:
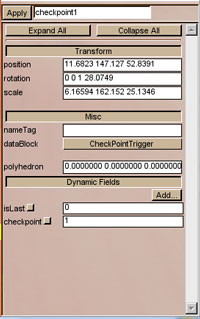
I decided to extend it a long way out to the right, in case someone drifts up there by mistake. It's set inside the barrier on the left. The actual checkpoint is the angled red cuboid here - the yellow box is just a bounding box, it's the inner one cars will use. Now we just need to add a couple of parameters to the object. In World Editor Inspector mode you can use the Add button next to Dynamic Fields to create new parameters. These are name/value pairs. Create one called isLast with a value of zero, and one called checkpoint with a value of one. The result should look like this:
The checkpoint value sets the order cars have to pass through the checkpoints, and isLast sets whether going through the checkpoint ends a lap. You should now be able to go round and create all the checkpoints for your track. Make sure the last one is properly lined up with the finish line, and set isLast to 1.
Important point - copying and pasting a trigger will sometimes leave you with the previous object selected instead of the new one. Make sure you know what you're editing the name of!
Waypoints[edit]
OK, this is the tricky bit. Waypoints tell the AI how to drive around the track - where they should turn and what speed they should be going. They're hard to get right, particularly because it's nearly impossible to test them in the editor - the physics is just too different. Still, you can at least test that the car tries to go around the track, even if it can't quite manage it.
Waypoints are grouped together into Car Paths. As this is a race track, we only need one. Wilderness maps need more, to cover every major route. To create one, go to Mission Objects->Mission, and create a Path. Name it CarPath. Now make this the active group (alt-click), and you're ready to add waypoints.
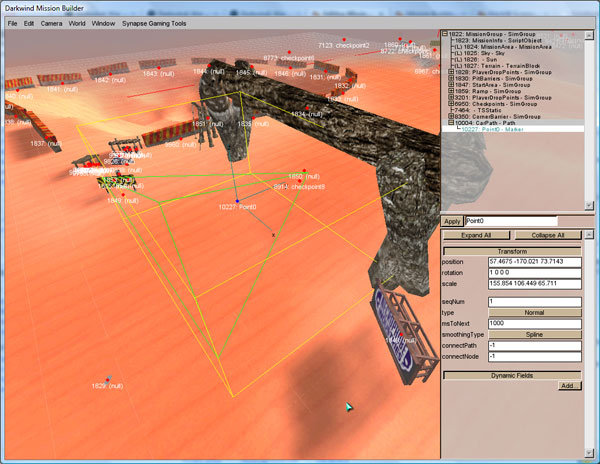
Waypoints are PathMarkers, found just below the path object. Create one and scale it up a bit, and it should look like this:
One important point with waypoints - never ever rotate them. It doesn't do anything, but the collision shape will rotate, so your track doesn't behave the way you expect. You will need to add one dynamic field to the marker. Call it speed. This is the speed in metres per second the AI will try to be going when it hits this waypoint. Sam's rule of thumb: "I use 200 for a waypoint you can take flat-out, maybe 40 for ones that can almost be done flat-out, and anything down to about 20 or 25 for tighter corners". The sequence number sets the order of the waypoints. It should sort itself out automatically, but you may need to edit it if you play around with the order or something.
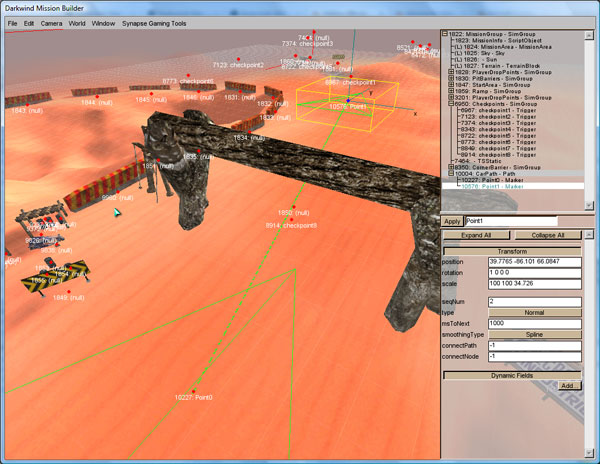
Now try creating another waypoint. You should see a line between them, something like this:
This isn't exactly the path the cars will take, but it's a useful confirmation that you've got the points in the right order. Now you should be able to add all the waypoints you need for your track. As with checkpoints, more is better. Inserting extras in the middle of the order is difficult, so it's better to have too many than too few.
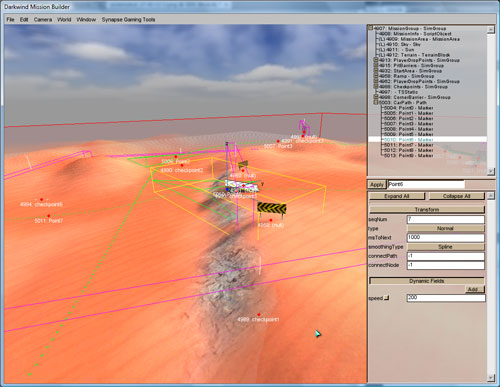
The finished version of my carpath looks like this:
Now you'll want to test your track. To do this, you'll need the following file:
[bug fix]
This makes the AI cars work in race mode, without it they only work in wilderness maps. Unzip the file and put it in the darkwind/server/scripts folder in the mission builder. You'll need to restart the mission builder too. Now load up your track, drive your car a little out of the way, enter editing mode, and press 1. An AI car should spawn and drive around the track. They're not too bright and the physics isn't too good but if it makes it to the finish line with only a couple of helping nudges I generally consider the waypoints good.
Finishing Touches[edit]
A few random things you can use to modify the look of your mission.
Water[edit]
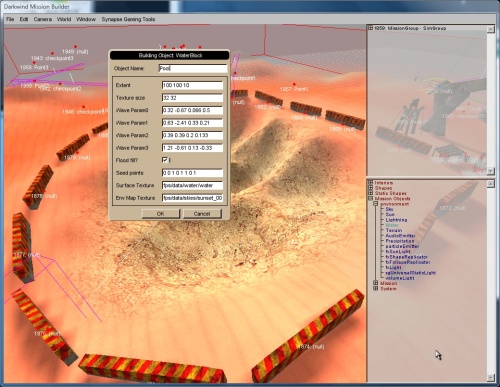
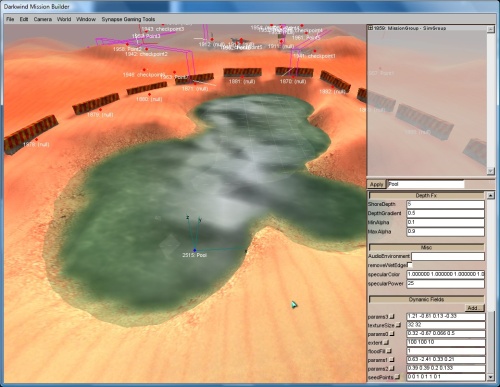
Water is created in cubes - either single small areas or one big enough to fill the entire map. You can find Water under Mission Objects. Don't worry about the parameters, they're easy to change later.
Once you have your water (it will look like a 2D sheet, only the surface is really visible) you can move it into place and start changing the parameters. I recommend opening up a level which has water you like the look of, and copying that. You can make the water appear to flow, change the colour, and all sorts of other things. I've copied the water from the gates of Elms, and made it look a bit less appealing.
Weather[edit]
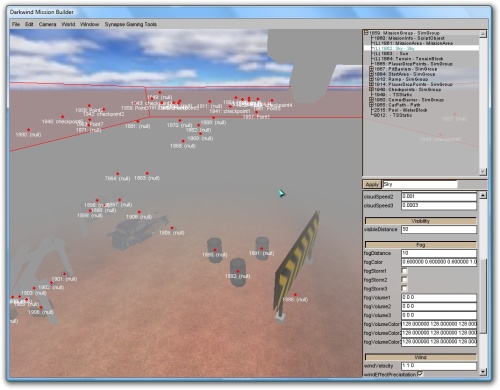
You can also play with the depth fog. If you look through the list of objects which are created for you, you should be able to find Sky. There are various different parameters - in this screenshot I've reduced the fog distance and visible distance down to almost nothing.
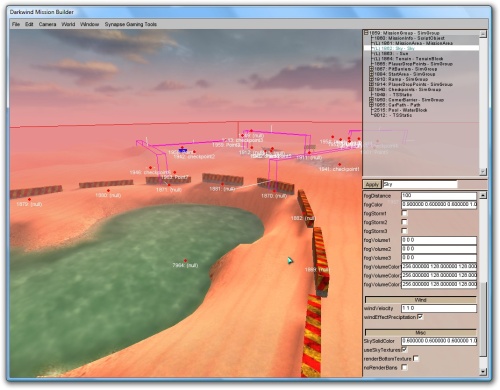
You can also change the fog colour (it uses RGB colour values). Here I've produced a nice pink fog. Very pretty.
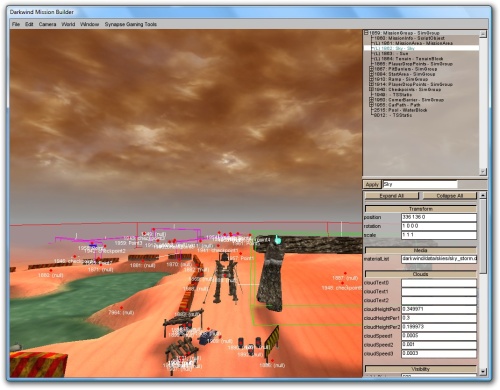
The final thing you can try is to change the sky texture. Have a look at MaterialList under Media. This is your current sky texture. If you find that file, there will be others in the same directory with the same extension. Those are the other possible sky textures. Play around until you find one that suits the mood of your level. This is the stormy sky texture, but there are a lot of others.
Sunlight[edit]
The last thing to try is changing the colour of the sunlight, if you want a sunset or stormy feel. Find the Sun object, and you can change the colour in the same way as with the fog. You will need to recalculate lighting for this to work. Here is an example with a reddish sun, although it turned out a bit too pink to really look like sunset. I also set the fog to yellowish brown, to blend in with the desert a bit better.
Creating a Wilderness Map[edit]
This guide goes over some of the parts of the mission builder that are most relevant to wilderness maps. Honestly there's not that much of a difference between a race track and a wilderness map - it's just more work, as you have to take into account that players can and will drive anywhere on the map. If you feel confident in your ability to make a map, just skip to the end and add the car paths and spawn areas, and you'll be good to go.
Terrain Generation[edit]
Unlike race tracks, the whole area is important. Players will be able to go everywhere, so we need to make sure there's something interesting in every direction. The first thing to do is to look at other maps in the area, try and work out how they were created.
I'll be using an empty map to demonstrate these transformations. The sun has been turned down to reduce glare, and fog is reduced.
The green area shows where the terrain will repeat. Darkwind maps loop forever (as you probably noticed), and this line shows the edge of the map section. You can't paint textures outside this area - you need to head over to the other side of the map. It doesn't have any effect in-game though.
Making a map starts in terrain terraform editor mode. There are two types of transformation - generators and modifiers. They work in order from top to bottom, and can be layered to produce complex effects.
Generators[edit]
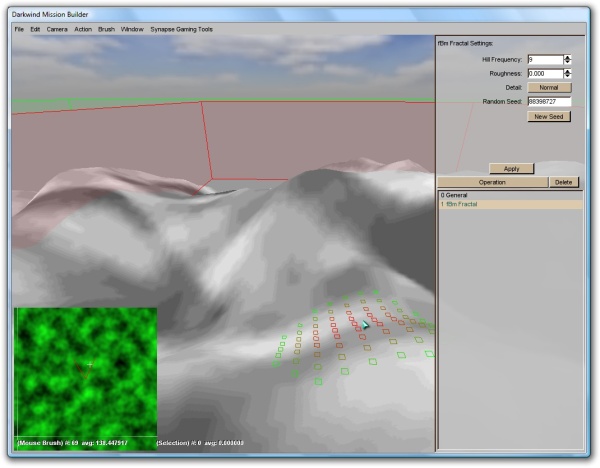
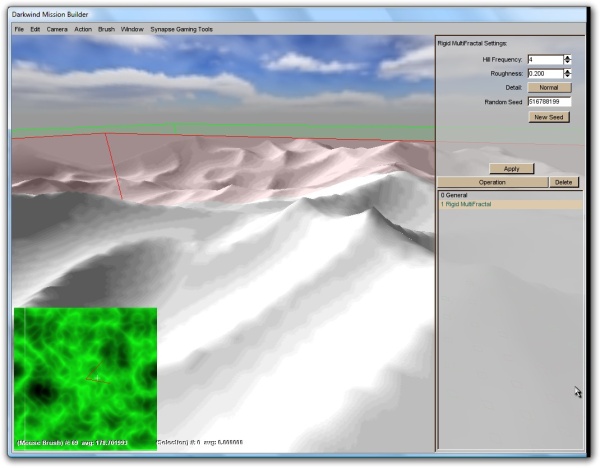
Generators override the terrain, and wipe out everything above them in the stack. There's no point using more than one of these, they just override each other. The "New Seed" button gives a different random terrain. The green minimap in the bottom left shows a preview of the terrain that will be generated.
- fBm Fractal - basic hilly terrain. Hill frequency is (more or less) the number of hills in the area. Roughness is the steepness of the hills (I think - it doesn't actually seem to do much). Detail adds smaller hills between the large ones. This is the most useful generator for most areas.
- Rigid MultiFractal - produces ridges or sand dunes. This is used for most of the terrain along the SS-Elms route. Frequency and detail as above.
- Canyon Fractal - Produces steep-sided canyons. Think of Sarsfield, or The Maze. Chaos adjusts how winding the canyons are. With low numbers of canyons and moderate roughness, this can produce rolling hills.
Low Chaos
High Chaos
- Sinus - produces small bumps all over the map. The graph will be important for a lot of operations, so it's worth explaining how it works. The height of the graph shows how much of that size effect will be part of the final terrain - large bumps on the left, small ones on the right. A couple of examples:
Small Ripples
Large Ripples
Varied Ripples
- Bitmap - claims to use an 8 bit bitmap as the base for a terrain. Unfortunately I can't work out which folder it looks in for bitmaps. Anyone who works it out, let me know.
Modifiers[edit]
- General - sets max and min terrain height. This is the biggest effect on the "hilliness" of the terrain. This is always the first transformation, and can't be deleted.
- Turbulence - adds extra noise and roughness to the terrain. It gives a twisting sort of effect. Requires clicking on a higher level and back before seeing any effects.
No Turbulence
Light Turbulence
Heavy Turbulence
- Smoothing - the opposite. Smooths out rough edges and makes a more even, rolling terrain. Number of iterations has the biggest effect on the outcome.
No Smoothing
Light Smoothing
Heavy Smoothing
- Smooth Ridges/Valleys - smooths only the top of mountains and ridges. Useful to avoid sharp peaks that cars have trouble driving over.
No Smoothing
Heavy Smoothing
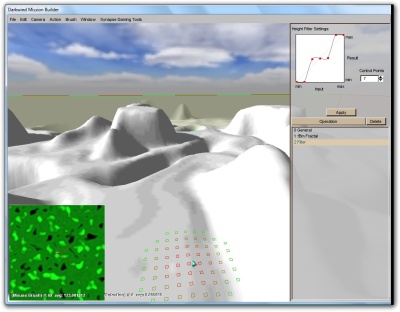
- Filter - applies a transform based on the height of the terrain - each input height can be linked to an output. There are all sort of complex effects that can be achieved like this, although I haven't experimented much.
The original terrain
Filtering used to set the terrain to three levels
- Thermal Erosion/Hydraulic Erosion - don't appear to do anything. Let me know if you work it out.
Automatic Texture Generation[edit]
Painting the whole map by hand would be slow and impractical, so unless we just want uniform sand we need to automatically paint textures. This is more art than science. I've managed to get it to work, more or less, but I'm not sure exactly what the rules are.
Use the add material button to add textures to your level. They come with a standard fractal distortion, just to add a bit of roughness to the edges and make the whole thing appear a little more natural. There are two additional placement options:
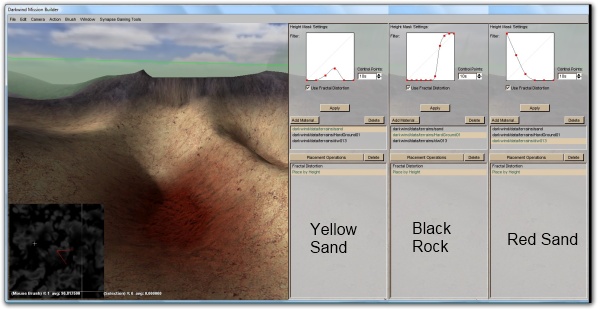
- Place by Height - Good for putting rock textures on the tops of hills, or underwater textures at the bottom of pools. Here's a quick example:
You can see that the sand is restricted to the middle layer, with red sand at the bottom of pits and black rock at the top of the hills.
- Place by Slope - Best used in combination with place by height. In this example, the black rock has been set to large slopes only, so the plateau on top reverts to the yellow sand.
Sculpting the Map[edit]
The techniques here are the same as for the race track above. Try to look at the map as you would playing it. Think about points where the player can sit at the top of a cliff or behind a pit and get easy kills, or use areas the AI has trouble navigating in order to escape. Then stop them. Remember, you score points for every player who dies on your map, double points if you can get them to drive into pits.
It's up to you how much hand sculpting you want to do. Some maps are just a few tweaks on top of a generated terrain, whereas some (The Pits is a good example) are largely built by hand. Hand built terrain can look amazing, but it's a lot of work - up to you. I prefer to have the computer do most of the work because I'm a lazy programmer.
Regenerating Textures[edit]
If you adjust the terrain and want to automatically texture it, you'll need to swap into Terraform Editor mode and back out again before your changes are recognised. There are actually a few situations like this, and swapping between modes or turning fractal distortion off and on again usually fix them. If not, you may need to quit and restart.
Decorations[edit]
Again, this is covered in the race track section. Adding just a few trees or shrubs can make a big difference.
Note that even though the terrain will loop, the objects won't be recreated. You can put objects outside the mission area though, which is a good idea if you have something like a bridge.
Car Paths and Spawn Areas[edit]
This is the major technical difference between a wilderness map and a race track. Like the track, car paths are needed to direct the AIs along your roads (not that they pay any attention, but you have to make the effort). However the form of the path is different and you may need more than one. You will also need multiple spawn areas, along with ambush points.
Car Paths[edit]
The simplest maps (which is most of them) have a single car path that follows a single road across the map. These are by far the easiest to make. Make a path just like you would for the race track, but instead of a loop you want a single line from one edge of the mission area to the other. The AI will head the first waypoint on the next repeat of the map when they get to the last waypoint on this repeat, so make sure the two points are close to each other. You also need to make the points big enough that the AIs won't miss them if they're driving slightly off road.
More complex maps may have multiple car paths that join and split it complex ways, but I can't help you there. Have a look at the gates of SS if you want an idea of how bad it can get. Then just stick to making maps with a single road on.
Spawn Areas[edit]
There are three types of spawn area available. Trader and Pirate spawns are the normal spawn points, and do what you expect them to. Traditionally the pirates spawn 100m - 200m behind the traders, but you could try some more unorthodox things if you want. Bear in mind that a head-on spawn will (I believe) put the players in the pirate spot, with the AIs facing them in the trader spot. These types of spawn consist of a SimGroup named in the form PlayerDropPoints1Pirate or PlayerDropPoints1Trader, which contains four SpawnSpheres. These mark (in order) the front-left, front-right, rear-left, and rear-right corners of the area.
Traders(left) and Pirates (right)
The third type is the ambush, named in the form AmbushPoints1Pirate. These are optional, but I like to add one to each spawn point, just to stop people getting complacent. These consist of 25 or more SpawnSpheres, which each give the position and facing of a single car.
Ambush points
You can have as many spawn areas as you like, just keep increasing the number. One nice trick (which I didn't think of when making Oil Slick, unfortunately) is to add spawns at both ends of your path, facing towards the centre. Driving the map in both directions adds a bit of variety, and it means players will be seeing all that nice decration you added from both sides.
Submitting Your Mission[edit]
Notes[edit]
- When adding objects to a scene, if they are solid black it's because you need to recalculate lighting (takes a while)
- Scene Groups can be found under Mission Objects -> System. Alt-click to add newly created objects to the group.
- Each map has a maximum of 8 textures. If you load another texture, it replaces the one you had in the slot before.
- Press F1 for help. Most of it seems accurate, and there's some useful info in there.
Info dump of Sam's forum posts on the subject:[edit]
I know some of you guys are interested in trying out the mission builder... so here's some quick links and instructions.
If you produce something useable in the game, great! If not, no problem!
This is the mission builder (Windows application, 250MB )
http://www.dark-wind.com/missionBuilder/missionBuilder.zip
There's also a Media Encrypter (Windows executable) which is required if you're making your own DIF models using the Torque Constructor:
http://www.dark-wind.com/missionBuilder/mediaEncrypter.zip
To start editing a mission:
Choose a vehicle and click 'start mission' then choose the mission.
Once in the game, press TAB to move the camera back behind the vehicle (otherwise you're stuck inside it). Driving around is a good way to make sure the track is the right size and that the ground is flat/bumpy as appropriate.
Use the mouse to steer and W/S to accelerate/brake
Use ALT/C to separate camera from vehicle
I know the cars drive very badly, its based on the default vehicle physics; I have improved things quite a bit in the real game, but this mission builder is based on a default Torque build.
The best way to learn about how missions are set up is to open a few and examine them. There's a bunch of finished and half-finished ones in the Mission Builder. (Some aren't very good and were never added to the game).
MissionArea
centrePoint = "303.000000 77.000000"; This is the centre point of the mission (2 numbers: X Y only, the up direction (Z) is ignored)
fixedRadius = "482"; How far the camera should be allowed to go from that centre point
Checkpoints
ONLY USED ON RACE TRACKS
You need a set of these, probably between 5 and 10 of them. In fact, the more the better. Make sure they overlap the track boundaries generously, so we don't penalise people who drift over the edges a little.
Each checkpoint is a Trigger object: checkpoint = "1"; This numbers the checkpoints (pretty obvious I guess) so we can tell that they're being visited in the right order to finish a lap without taking illegal shortcuts. isLast = "1"; Only the final checkpoint has this value. Note that the final checkpoint needs to precisely line up with the start/finish line. The finish line is just an object, no special data needed. In fact I've used things like orc's clotheslines and hitching posts blown up to massive proportions.. ;-)
Spawn Areas
RACE TRACKS HAVE 1 SPAWN AREA ONLY
The spawn area is specified by using two SpawnSpheres inside a SimGroup called PlayerDropPoints. These two SpawnSpheres show the opposite corners of a rectangle into which the cars will be spawned. The first is the 'front' of the starting grid and the second is the 'back' of the grid. The rotation of the first SpawnSphere will be the rotation that cars are spawned at.
Alternatively, you can out a full set of 25 SpawnSpheres into the PlayerDropPoints SimGroup. This specifies precise locations rather than have the server fit them all within an area.
ARENAS HAVE EXACTLY 2 SPAWN AREAS (Open up SomersetMineArena.mis to see) Now we have 4 SpawnSpheres inside PlayerDropPoints. The first 2 points delimit the first team's spawn area, and the last 2 delimit the second team's spawn area.
WILDERNESS ROADS HAVE SEVERAL SPAWN AREAS PlayerDropPoints1Pirate and PlayerDropPoints1Trader are two SimGroups containing either 4 or 25+ SpawnSpheres. If they have 4, then they delimit the front-left, front-right, rear-left, and rear-right corners of an area. If they have 25+ then these are precise spawn locations. Note that the Y axis is the forward direction of the car.
To have additional spawn locations on a wilderness map, use PlayerDropPoints2Pirate, PlayerDropPoints2Trader etc. – are SimGroups containing SpawnSphere objects.
AmbushPoints1Pirate, AmbushPoints2Pirate etc. are optional extra SimGroups containing 25+ SpawnSphere objects.
Waypoints
Open a .mis file and look for a Path object called CarPath. In this are Markers (which are the actual waypoints the NPC cars use). The names and seqNum values are ignored: it's only the order of them that matters. Their important fields are: __scale __- this is the actual size of the waypoint. The NPCs aim towards their centre, but as soon as they cross the boundary of the one they're heading for, the immediately aim for the next one. Notice how they're set up on some of the key corners, to make the NPCs turn into the apex at the right time. __speed __- the speed the NPCs should aim to be at when they hit the waypoint. This is actually metres per second: multiply by 2.25 to get mph. As a rule of thumb, I use 200 for a waypoint you can take flat-out, maybe 40 for ones that can almost be done flat-out, and anything down to about 20 or 25 for tighter corners. __mustNotAvoidCars__ - give this field the value 1 if the waypoint is too dangerous to do anything silly like avoid enemy cars or mines, since there are walls etc. too close nearby. __isOffroad __- this takes 2 possible values, or can be omitted. A value 1 means this waypoint is only for offroad vehicles (e.g. the buggy or the landrunner) to use (they have better tyre friction and this can be significant in places where other cars slide a lot). A value 2 means this waypoint is only for non-offroad vehicles. If you omit the isOffroad field then all cars use the waypoint.
RACE TRACKS HAVE 1 CARPATH
ARENAS HAVE BETWEEN 2 AND 4 CARPATHS (open up SomersetMineArena.mis.waypoints and you'll see the first is called CarPath and the second is called CarPath2. The first is the path that cars from the first team start to drive on until they decide there's something better to do. The second is the path the second team start to drive on at the beginning of the combat.
Never make an angle of more than about 70 degrees between 2 subsequent waypoints, otherwise the NPCs can get confused and might turn the 'long way around' to face the way they need to go.
WILDERNESS MAPS HAVE 1 OR MORE CARPATHS. The key thing here is to recognise that the terrain repeats itself, and the CarPaths need to connect to themselves or another CarPath in order to provide data for the NPCs to drive the road over multiple terrain repetitions. It can get a bit confusing, but if you stick to a single carpath that covers exactly 1 terrain repetition then it will work fine. More complex terrains are harder (take a look at gates of somerset for example).
Some extra notes on getting waypoints and checkpoints right:[edit]
Waypoints:
These are 'Marker' objects that must be inside a path called 'CarPath' Do not apply any rotation to them as it will be ignored by the AI code and it therefore misleading Make sure they are not narrow in any direction. The way the AI cars use these is that they aim for the centre of the waypoint, but as soon as they cross the waypoint edge, they then switch to the *next* waypoint. So a narrow waypoint will cause erratic driving. They need one dynamic field: --> 'speed' is the maximum speed that should be driven when close to this waypoint. It is measured in metres per second (1ms = 3.6kmh = 2.25mph)
Checkpoints:
These are 'Trigger' objects and must use the 'CheckPointTrigger' datablock You *can* apply rotations to checkpoints Make sure their bases are below ground so cars don't pass under them. Make sure their tops are nice and high too, just in case cars are airborne etc. They need to have two dynamic fields added: --> 'checkpoint' takes the checkpoint number (starting at 1) --> 'isLast' takes the number 0 or 1. The checkpoint that lines up with the start/finish line is the only one that should have 1 for this value. Note that this should also be your *final* checkpoint, not your first one.
Spawn Spheres:
The order of these, rather than their name, determines their position on the grid
Notes on Racetracks:[edit]
(1) To get the cars spawning at the right place, make sure that the SpawnSpheres are *inside* the PlayerDropPoints simgroup, not after it. To be inside, they need to be directly after the { symbol and before the }; symbols
Like this:
 new SimGroup(PlayerDropPoints) {
   spawnspheres are in here..
 };
(2) The scale of the Marker objects (which define the NPC route around the track) is very important. The position of the markers obviously defines where the NPCs should steer towards, but until they cross the edge of a Marker they won't move onto the next one. So if the scale is "1 1 1" they'll have a very hard time driving the track since they will insist on passing through a precise area 1x1 metre in size. If you open up one of the existing files, such as the Northern Desert Circuit, you'll see how the size is used to make them start turnning before they get to the apex in many cases.
(3) Don't worry about the looping constraint, that will be easy to fix by forcing the track to always have 1 lap races.
